In 2015, MCL launched the Tuesday Tip series. Tuesday Tips are self-care exercises designed as a resource for Movement Educators, Physical Therapists, Chinese Medicine practitioners and their respective clients/patients. Tuesday Tips self-care exercises are linked toshortvideos onourYouTubechannel for ease of use and have been posted to our Facebook and Instagram accounts. If you are interested in submitting a question/topic for a Tuesday Tip self-care post, send your suggestions to: info@movecolab.com.
We want to hear from you! Did a Tuesday Tip self-care exercise help you?
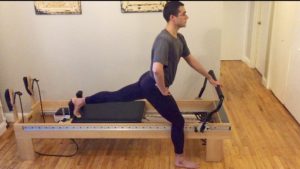
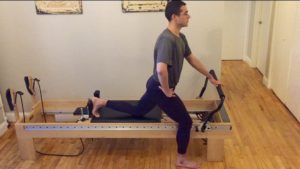
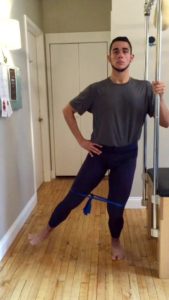
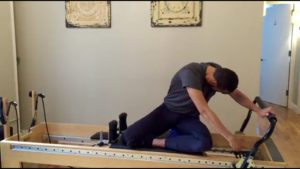
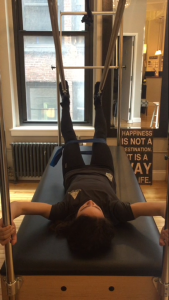
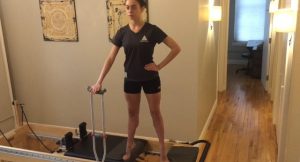
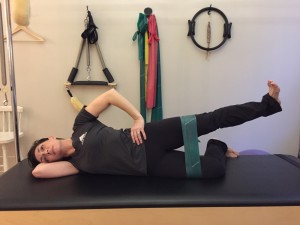
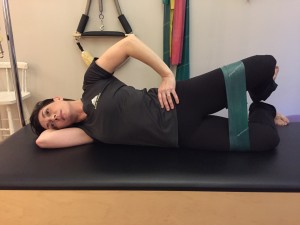
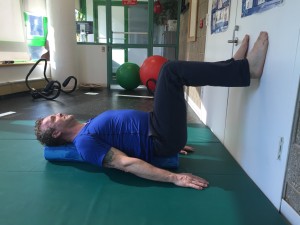
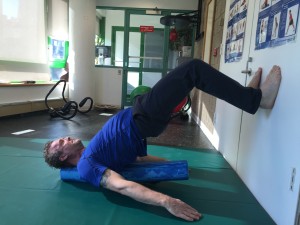
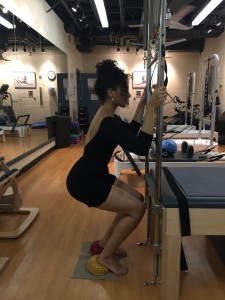
Obtaining hip stability while in motion is critical to injury prevention. By engaging the correct muscles of the lower extremity, you will help support your hip placement in ranges of motion, large or small. Performing this week’s Tuesday Tip you will strengthen the standing hip in a static position while mobilizing the other hip, mastering acceleration and deceleration of the gesture leg.
Set Up:
Springs: Blue (medium) or Red (Heavy) Spring
Footbar is set to comfortably reach with straight spine.
Left hand holding on to footbar and right hand on hip.
Runner’s lunge with right knee bent, left leg extended with foot on shoulder block.
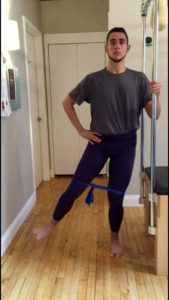
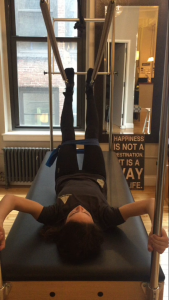
Exercise:
Maintaining a leveled pelvis, slowly bend your left leg in 3 counts until your knee slightly touches the reformer and straighten in 1 count. Mastering deceleration control. Repeat 3x.
Reverse the action, slowly straightening your leg in 3 counts and bend in 1. Mastering Acceleration control. Repeat 3x.
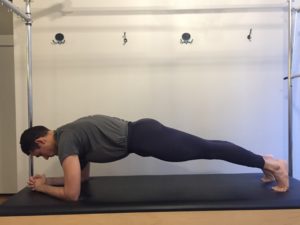
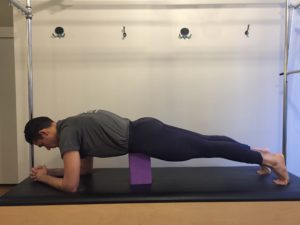
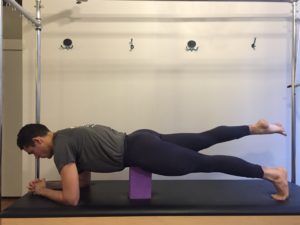
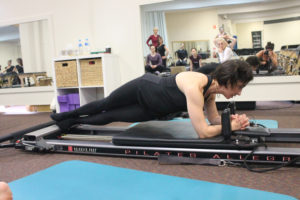
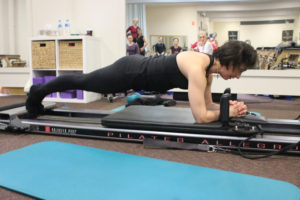
Do you ever feel like planks in a group class feel like a battle? Planks provide a wide range of benefits including strengthening anterior muscles of the hip, increasing core control and shoulder organization, while improving posture. In this week’s Tuesday Tip we provide a modification specifically for individuals working on increasing core control or those coping with labral pathologies both pre and post surgery. Note: you will need a Yoga block for this exercise.
Assessment:
Simply pick up your smartphone and notice your posture as you do this (this includes shoulders over hips and back alignment). Try to take a selfie before changing your posture.
Exercise:
On a flat surface perform a forearm plank.
Take your yoga block and place it directly under the left side of your hip. (Based on your size, you will need to adjust the height of the Yoga block). Hold the plank for 4-8 slow breaths. Do you feel any decrease in intensity on your hip and lower spine?
Once stable, release your right foot off the ground and hold again for 4-8 slow breaths.
Return and repeat on the other side.
Reassessment:
Reach for your smartphone again, notice if you feel any difference in range of motion and ease from the first time. Retake the selfie and see if you can spot any differences in your posture compared to the first selfie.
Plank
Plank with Modification
Plank Modification with Leg Raised
How did this MoveCoLab Tip work for you? Email us your results at info@movecolab.com
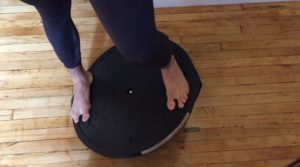
The foot and ankle are the first points of contact for the kinetic chain of our lower extremity. Knowing the talus is the Sacrum of the foot, if we effectively mobilize and create dynamic ranges of motion to it we can translate these forces to the knee and hip efficiently. For some people, serious alignment complications can often be a result of lack of mobility and dynamic stability in Dorsiflexion (flexing toes back) or Plantarflexion (pointing toes forward), as well as pronation (rolling inwards) and supination (rolling outward). The Talus is the bone that bridges the leg to the foot/ankle. And, if we efficiently articulate this bone to its full scale we can absorb and transmit forces to create a smooth kinetic chain.
Assessment:
With your arms straight in front of you, take a seat in a chair. Stand up and immediately lift one foot. Do you feel balanced? Do you feel unstable?
Exercise:
Stand up tall in parallel, on a BOSU (belly down), making sure to align shoulders over hips. NOTE: hold on to something stable for support.
Next, while maintaining your level in space, bend your left knee, knee over toes aligned, resulting in a complete shift of the BOSU to the left side. Perform this same action on the right side. Repeat 5x.
Then, return the BOSU to the center only this time bend both knees while sustaining the BOSU in its center position.
Finally, keeping the bend, rock the BOSU forward and backwards. Repeat 4x.
Reassessment:
Repeat the same task as the assessment. Do you notice any change in your speed from sit to stand? Do you also notice any change in how easy you can lift one foot and balance?
What makes an Olympian or an Artist an elite athlete? Most certainly it is their physicality, but what makes one more amazing than another? When we are measuring “winning” in 1/100ths of a second, (think Michael Phelps or Usaine Bolt winning a race by a few hundredths of a second) it is their focus before and during an event that is the game changer. Watch an athlete right before their event. How do they warm up their bodies? How do they train their minds? Physical training is done- now it is time to compete. Having your mind in the game is the game changer. Mental clarity, focus, and imagining yourself a winner is what can give you or the elite athlete an edge in competition or performance.
Joseph Pilates wrote in his book Return to Life Through Contrology (in 1945!) “One of the major results of Contrology is gaining the mastery of your mind over the complete control of your body”. Brilliant! Many of us watched Michael Phelps prepare for a race with headphones on and his robe over his head; Usaine Bolt jogged around yet was relaxed and goofing around. On the starting block, he was focused. Dancers stand in the wings and run through their choreography to connect their bodies to their minds. The spiritual aspect occurs while they are on the stage performing and often get lost in the moment- they are in their zone and have complete mastery of mind and body.
When you are at the gym and you are in your “zone” you are balancing your mind, body, and spirit harmoniously and achieving the maximum output and control that you are capable of. When you are tired or distracted, how hard is it to find that place and then you have a bad run, a less than optimal workout? Yet, how high do you feel when you connect all three? How about that big presentation you have to give or the interview for that coveted position you have been wanting? By exercising our bodies, breathing deeply, and focusing our attention on a task, we can all find the perfect balance of mind, body, and spirit.
How did this MoveCoLab Tip work for you? Email us your results at info@movecolab.com!
Dry needling is performed with an acupuncture needle, which is a solid filiform needle. I often describe it as very sharp wire. There is no hole in the center of an acupuncture needle, which is different than a hypodermic needle. A hypodermic needle is a hollow needle where the canal in the center of the needle is used to inject a medication or to draw blood.
Red – Chinese Meridian. Blue – Trigger Points.
Why would you seek out dry needling? Pain is often of a muscular origin due to chronic “knots” (also called trigger points) in a muscle. Massage is helpful to release these but when trigger points are chronic, it is very difficult to release them thoroughly with manual techniques. Dry needling can be much more effective at releasing this chronic tension, but may also leave you with increased soreness for a few days. Typically, the day following trigger point needling, patients report feeling sore, as if they had an intense workout. This sensation is due to the treated tissue lengthening into a new position.
Trigger point needling may be performed using either type of needle with the difference being the practioner’s approach. If your MD performs trigger point needling, they often will inject a small amount of pain medication into the area when they elicit “the twitch” (fasciculation) in the affected muscle. Research has shown that what is injected is not necessarily what eliminates a trigger point; rather the result is reached through the act of needling the muscle until the twitch is produced. The twitch or jump that you feel in the muscle is actually a lengthening of the muscle to a more normal resting length as opposed to being tight and balled up, like a knot. This release is similar to what happens when you pop a water balloon. Fascia surrounds every muscle much like the balloon surrounds the water. If we prick at the fascia with a needle, we can release the fascia and the muscle twitches as it relaxes into a new, untangle position thereby releasing tension.
In the photo shown here, I have used a combination of a traditional Chinese meridian approach with an overlay of trigger point needling to the muscles of the shin. This is a highly effective method of treatment because the excess Qi, (energy), which is released from the muscles of the shin, needs to be diverted somewhere, much like floodwaters need to be channeled downstream. The red line represents meridian based treatment while the blue line represents the area where trigger points were released in the top of the foot and the shin of this patient. You can see the redness of the skin due to the release of pent up energy from the muscles. This is Qi moving from a stagnant point to movement.
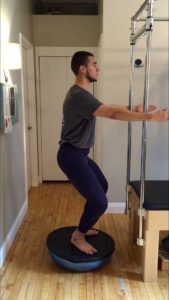
Hip stability is vital for everyone, not only athletes and performing artists. Athletes and performing artists utilize hip stability to jump higher, run faster, and shift their bodies efficiently from high to low levels. By practicing hip stability exercises on an unstable surface we offer a greater sensation for the brain to organize the lower extremity efficiently. This motor control is critical for ascending and descending painlessly in your activities in daily living.
The next time you go down the stairs, notice how your body reacts. Do you experience pain or discomfort when moving from one stair to another? Do you experience weakness and instability? Do you feel as if you are catching yourself? If so, try this exercise.
Exercise:
Standing in Pilates “V” on a BOSU (belly down) take a slow plié for three counts and straighten in one. Note: Make sure hips are acting as an elevator – vertical axis, only up and down. Repeat 4x.
Next, take another slow plié for three counts and hold.
Finally, take 8 small pulses of the knees outwards.
Repeat the exercise two more times.
Reassessment:
Did your pain or discomfort decrease? Do you feel as though you are gliding down the stairs?
Did this MoveCoLab Tuesday Tip help? Share your findings with us at info@movecolab.com
This week’s Tuesday Tip focuses on the latest buzz regarding Olympic athletes using Cupping as a means of rehabilitation. Read below on what MoveCoLab’s Bob Turner has to say on Cupping:
“Religion is based on the belief there is a higher power but where is the evidence? My practice takes on many forms and faith in my results informs my treatment approach. Religious beliefs are no different. While science has not proven divinity, our beliefs remain strong. Remain open minded and take a leap of faith in your healthcare. MoveCoLabion is our gut feeling. With no direct meridian to the brain, Chinese Medicine is more instinctual and does not second guess success or failure but learns from it and moves on.
When physical therapy became a valid profession there was no science behind it. What started as an empirical practice (“I do this because it works”) became evidence based (“research proves this works”), we find that following MoveCoLabion can have beneficial effects. Acupuncture and cupping follow the same guidelines. Science has not yet caught up to what we practice but does that mean it does not work? Can we treat based on the belief that a technique works because we see the results and our patients feel the results?
While cupping has received a good deal of media attention with the Olympic Games in Rio this year, much debate and many blogs have surfaced questioning the effectiveness of cupping and the science behind the practice. As an acupuncturist and a physical therapist, I am very fortunate to be able to combine both an Eastern and Western lens to the treatment options used with my patients. I use whatever gets me the results I desire.”
In addition check out this article of an interview with Bob regarding more in depth information on the history of cupping as well as various cupping techniques!
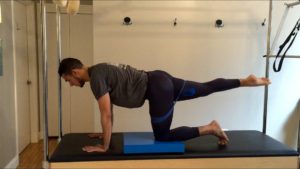
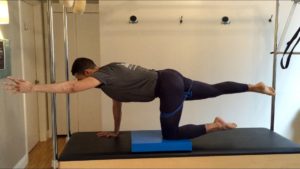
Core control and hip stability are two ways to improve efficiency of major muscle groups and longevity of joints in your body. This week’s Tuesday Tip focuses on these two pillars of movement to help organize your body for years to come.
Assessment:
On a BOSU (belly down) perform eight half squats on one leg in parallel. Notice how much the BOSU is moving. Are you able to keep the flat surface parallel to the floor? Are you able to keep your shoulders aligned over your hips?
Exercise:
Begin in quadruped position with a theraband tied around both thighs (use a foam pad underneath one knee to increase the challenge).
Slowly extend your hip to create a straight line between sits bones to your toes, while balancing the knee on the foam pad. Repeat up to 4x.
Slowly extend your opposite arm to create a straight line from your shoulders to your fingertips. Repeat up to 4x.
Then, extend your hip and opposite arm simultaneously to create a strong diagonal line from your shoulders to toes. Repeat up to 4x.
Repeat this contralateral variation and then pick up the toes of your supporting leg, hold for 8 counts. Repeat up to 4x.
Repeat on the other side.
Reassessment:
Repeat the assessment exercise. Is the Bosu moving less than before? Are your shoulders aligned over your pelvis with more ease? Do your hips feel more stable as you bend and straighten your legs on the Bosu? Are you able to perform the half squat without holding onto anything?
When performing your standing LE home exercises, try a set with knees bent. Flexing the knees allows the hip musculature to up-regulate as the hips will need to propriocept and stabilize more over a bent knee than compared to an extended knee. When performing on an extended knee, be mindful that you are drawing energy up the LE and creating the most space between the hip joint and ankle joint. This will prevent “locking” into the knee joint and sagging into any available hyperextension of the knee.
Try the Standing Abduction with Theraband exercise, performing one set with bent knees.
Assessment: With both knees extended, slowly abduct one leg while maintaining balance and stability of the standing leg. Perform 4-8 reps
Set Up:
Lasso a blue to green theraband around your lower thigh.
Legs in parallel, hip width apart. Be sure to have your ribs stacked over your pelvis, spine in neutral; kneecaps directing over the second toe, heels are grounded on the floor.
Exercise:
With legs in parallel, repeat the assessment exercise, now with both knees slightly bent. Perform 4-8 reps.
Progress to deceleration control, by taking 3 counts to flex the knee, then extend the knee in 1 count. Perform 4-8 reps.
Then master acceleration control by extending the knee in 3 counts and flexing the knee in one count. Perform 4-8 reps.
Reassessment:
Perform the assessment choreography again. Do you notice a difference in your graded muscle activation, balance and control?
Now try the Tuesday Tip from 8/25/15 with knees bent. Then, try performing other LE standing exercises with knees bent for one set. What are your movement outcomes?
Did this MoveCoLab Tuesday Tip help? Share your findings with us at info@movecolab.com
The thoracic spine is responsible for: a). Lateral translation of the ribs b). Lateral flexion of the spine c). Rotation of the spine
When we “remind the ribs” of these three movements, and in this progression, we are able to access greater ranges of motion of the thoracic spine with more ease. Try performing Mermaid on the Reformer by Reminding the Ribs. When you use this sequence, are you able to access new ranges?
Assessment:
Perform your favorite Mermaid choreography on the Reformer.
Note the sensation to the thoracic spine and available range of motion.
Set Up:
One Red or Blue Spring. More spring tension will offer stronger feedback. Lower spring tension will require greater motor control.
Z sit on the carriage with level sits bones. Use a yoga brick under one hip to assist in leveling the hips. The closer you sit towards the footbar, the more spring feedback you will draw from the machine.
Hand on the footbar is slightly in front of the shoulder to encourage scapular depression. Gently externally rotate the humeral bone from the shoulder joint to increase congruency between the humeral head and genius fossa.
Exercise:
Press the carriage out slowly maintaining rib cage stacked over the hips and spine neutral. Maintain an extended elbow as you range the spine in lateral translation, lateral flexion and rotation. *NOTE: The extended elbow creates a spring tension relationship with the Reformer. This spring tension relationship helps feed the brain information about how the spine is moving and from which segments.*
Laterally translate the ribs, allowing the carriage to move. As the carriage glides further in and out from “home” the ribs are increasing their range for lateral translation.**
Lead with the crown of the head and laterally flex the spine, keeping the carriage still. A still carriage will help you screen for faulty movement patterns of the lower spine and pelvis. In lateral flexion, the pelvis should remain neutral with both sits bones grounded and level. Open the rib cage by increasing the space between the ribs on one side and space between the ribs decreases on the other side.***
Rotate the spine keeping the carriage still. A quiet carriage helps screen for unwanted movement of the pelvis and lumbar spine. Rotate from the thoracic spine only. Sits bones are anchored into the carriage.
Reassessment:
Now perform your favorite Mermaid choreography again.
Were you able to increase your range and ease of movement in the spine by performing the lateral translation first, lateral flexion second, followed by thoracic rotation?
Did the MoveCoLab Set Up help your overall organization of movement?
*From Kim’s Teaching Tour in Australia! Thank you Cat Giannitto and the Polestar Australia Team for your generosity and kindness.
The thoracic vertebrae are built to rotate the spine. Can you find spine rotation from the thoracics in upper extremity weight bearing? Challenge yourself to stabilize through the shoulders by maintaining shoulder alignment over elbows.
**STEP 4 Photo by Cat Giannitto
*STEP 3 Photo by Cat Giannitto
Set your Reformer up on a medium spring: blue or high yellow. Note: Less spring tension will increase the challenge to the core. More spring tension will increase the challenge to the UE.
Place forearms on the carriage, interlace the fingers, pike the hips up and squeeze legs and feet together as if they are one extremity.
Slide the carriage out slowly until your shoulders are aligned over your elbows, hips lowering in to plank position, ankles dorsi flexed powerfully, feet pressing into one another.*
Keeping the carriage still, rotate the spine from the mid thoracics. Move the lower extremity in one piece as you stack the feet over the 5th metatarsal.**
Rotate from one side to another, pausing in plank between each rotation. Complete 4-8 rotations.
Retrograde the mount to bring the carriage home.
How did this Tip work for you? Email us your results at info@movecolab.com!
Improve pelvic stability with the side-lying series on the Cadillac. Working from a side-lying position facilitates activation of the bottom oblique, transverse and pelvic floor to stabilize the pelvis while ranging the leg. It is important to maintain length in the spine and to keep the top hip reaching long so there is space between the waistline and the table. Throughout the exercise watch for shifts in the hips by monitoring the pelvis and the lower oblique, we want the gesturing leg to range freely without disturbing the pelvis!
Set Up:
Spring: One long yellow spring
Side-lying: legs can be slightly in front of the pelvis, shoulders and hips stacked, yoga block can be used to prop head
External rotation, Pilates V with bottom foot propped on the ball of the foot
Top leg will be sprung, energy in both feet
Bottom arm holds the riser while top arm rests in front of the body with fingers tented to maintain stacking of the shoulders
Exercise:
Slowly lower the leg until the heels meet*
Drag the heel up the bottom leg towards the knee, allowing the spring to fall in front of the knee**
Extend the knee sending the top leg long while maintaining some tension on the spring
Retrograde the movement so that heel is reaching back to knee
Slide the heel down the bottom leg until the heels meet again
Raise the top leg to about 45 degrees and flex the knee to touch the heel to the ankle
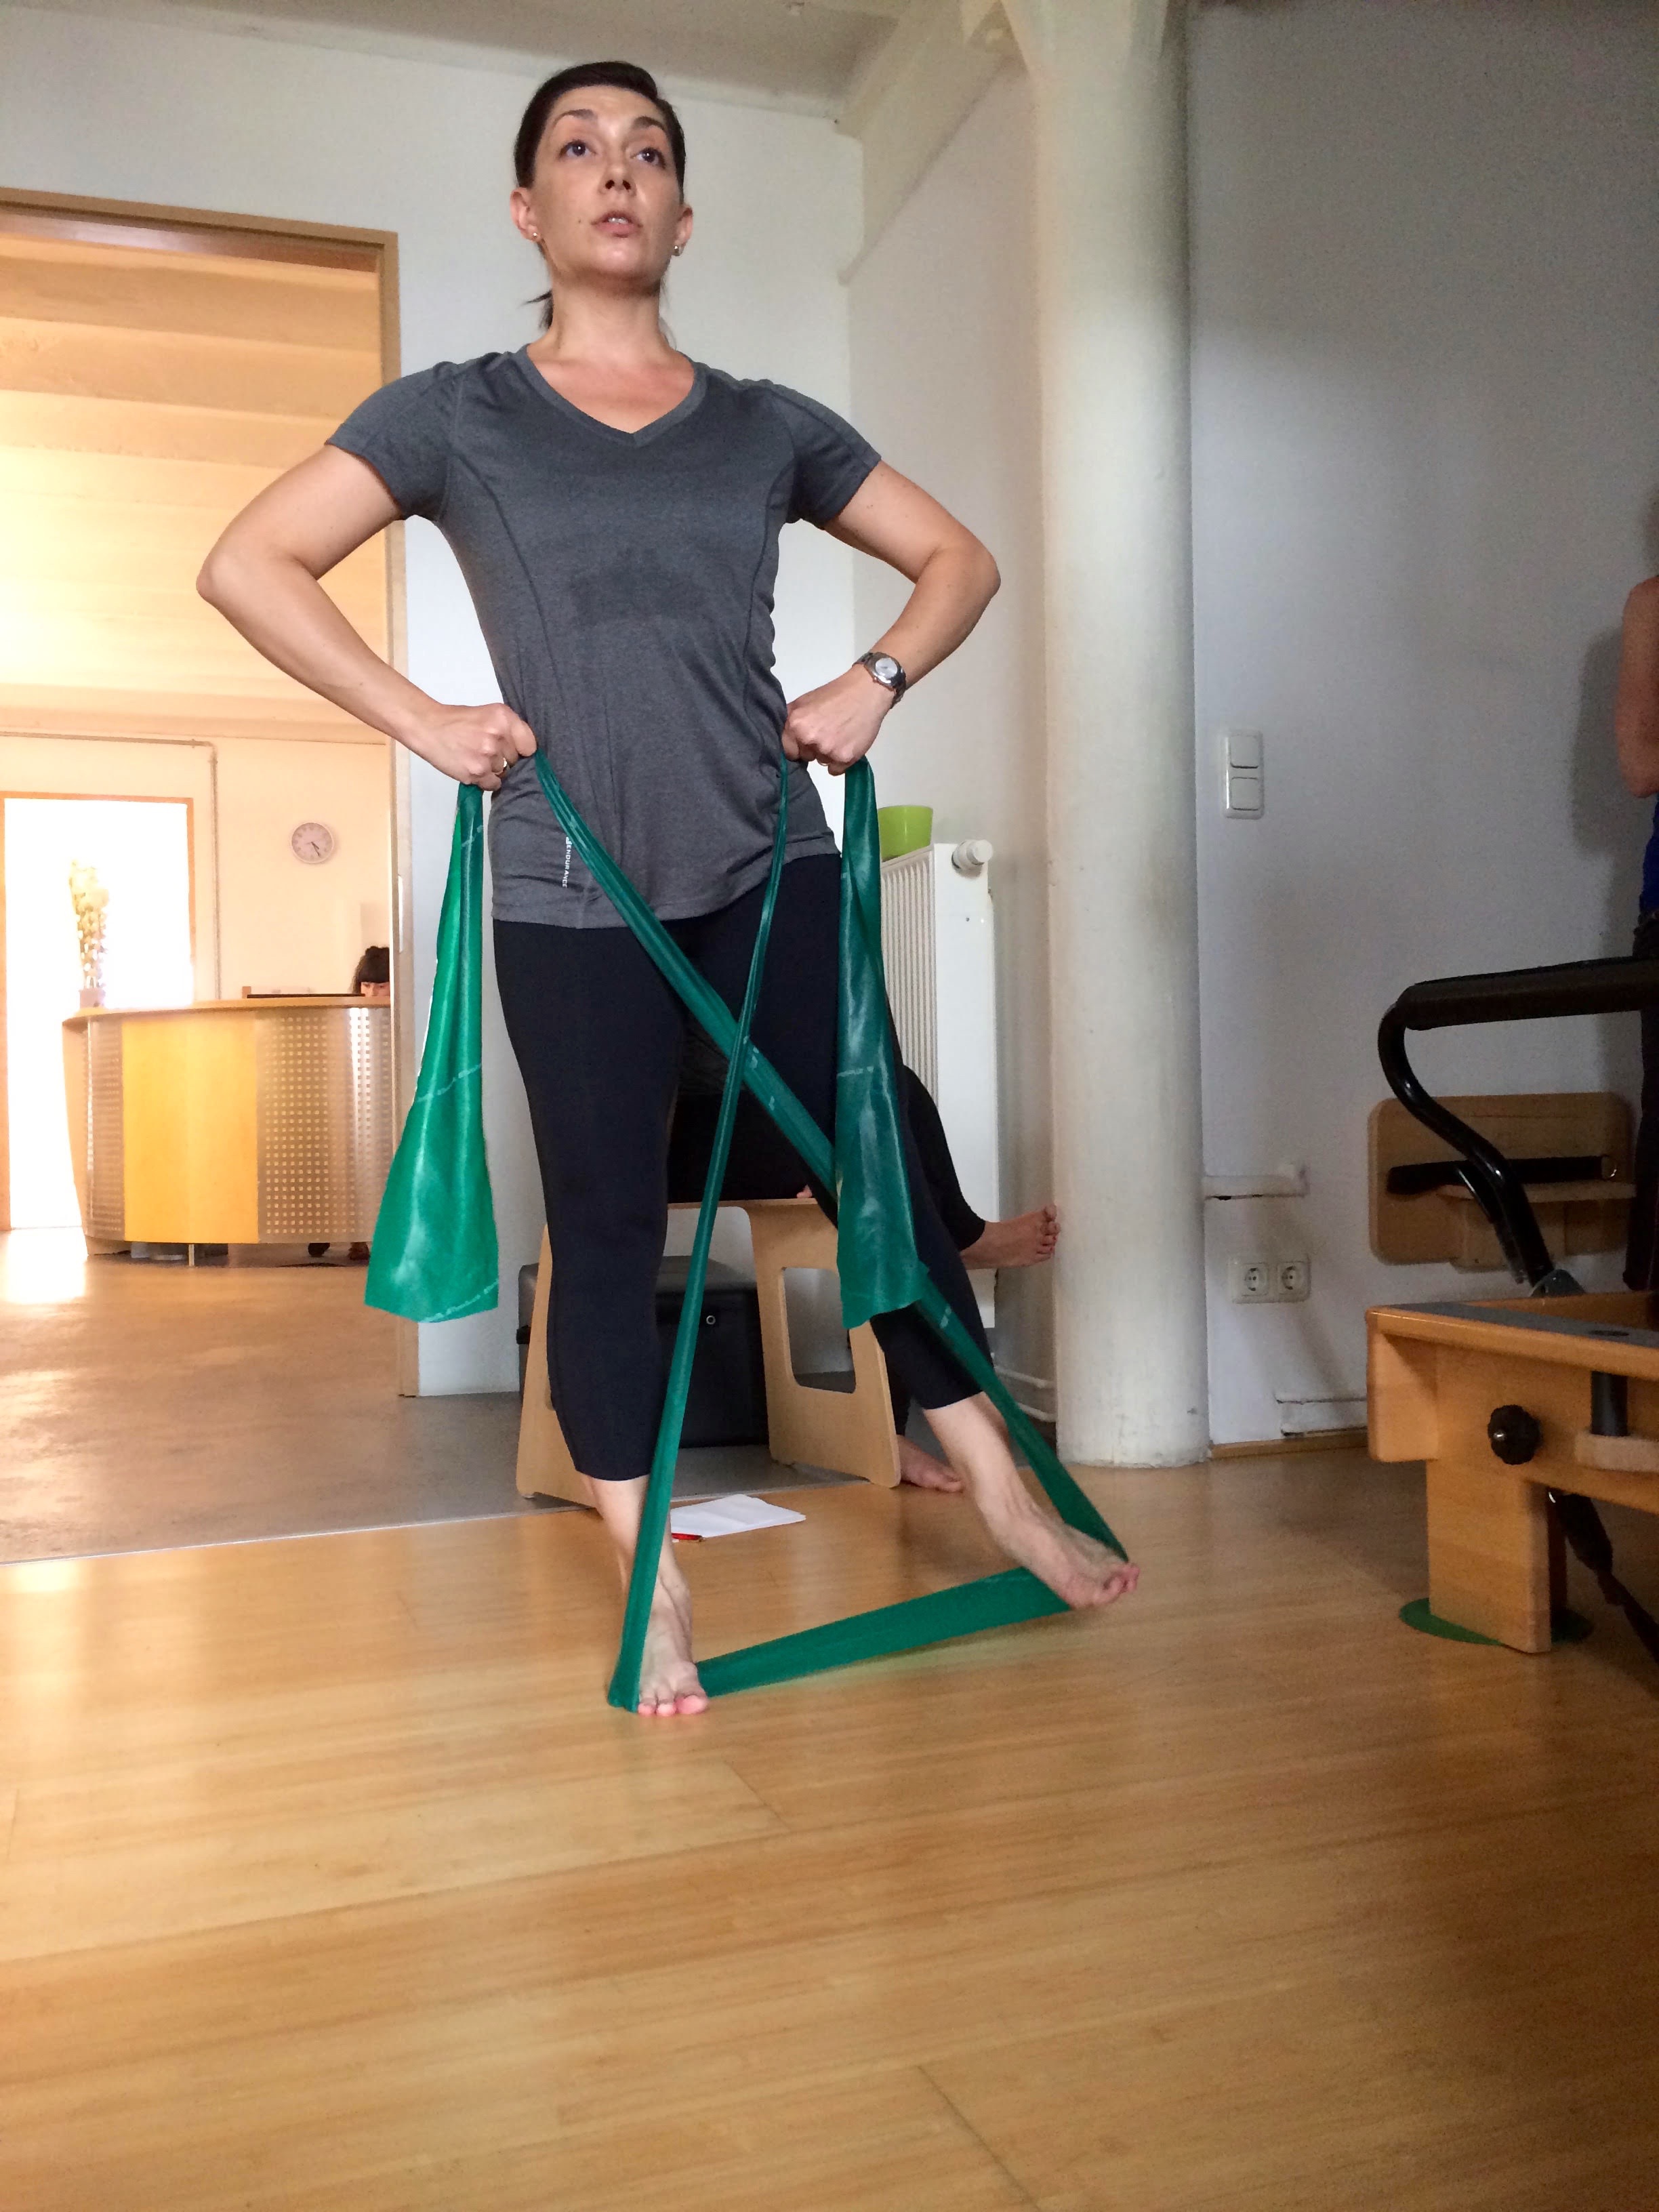
Change up the way you do/teach the leg spring series by adding a theraband to fire up the hip abductors.
This series focuses on strengthening the muscles that stabilize the hip. It is important to keep the legs abducted to maintain tension on the band throughout the exercise. As you continue into hip and knee flexion feel how you also work your glutes and hamstrings!
**STEP 5
*STEP 1
Set Up:
Springs: 2 long yellow springs
Begin supine on the table with arms overhead holding onto the risers, arms can be slightly bent
Legs are parallel with theraband tied around the thighs, right above the knees
Shoulders are plugged into the back, spine reaching long with sacrum heavy on the table
Exercise:
In parallel, abduct the legs to keep tension on the theraband*
Lower and lift the legs 4x while maintaining a neutral pelvis
Press the legs down to the diagonal and flex the hips and knees to 90 degrees
Bend and extend the legs 2x
Leave the legs lengthened out on the diagonal, keep one leg steady while pulsing the other out to the side 4x – maintain parallel**
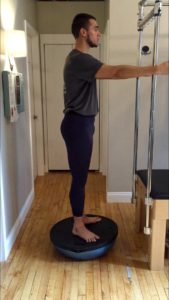
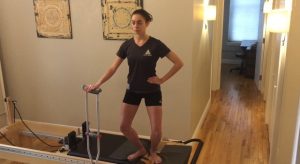
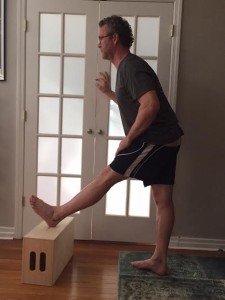
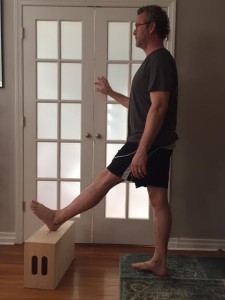
This exercise is designed to target adduction of the inner thighs.When developing the muscles of the lower body we tend to focus mainly on the glutes, hamstrings and quadriceps. However, the adductors are equally as important for overall strength and stability of the lower body. Activate your inner thighs with this standing variation inspired by Sandra Brown (Soloist, American Ballet Theatre, 1987-2003; Ballet Mistress, Colorado Ballet). This exercise also focuses on axial elongation, alignment and balance.
Set Up:
Springs: One high yellow spring (light spring)
Footbar is down and platform is secured
Standing on the reformer in Pilates V with one foot on the platform and one foot on the carriage
Heels will touch and hover over the space between the platform and the carriage
Hands on hips or gondola stick can be used to assist in balance
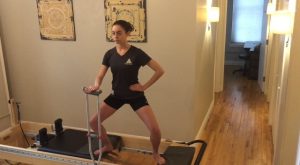
Sequence:
While maintaining external rotation of the legs, flex the knees without moving the carriage. Maintain alignment of occiput, T7 and sacrum*
Press the carriage out with knees flexed while maintaining the tracking the of the knees over the first and second metatarsals**
Without moving the carriage lengthen the legs
Without moving the carriage raise the heels, sending energy out through the crown of the head
Maintain this length and slowly draw the carriage in zipping the inner thighs together***
Once the carriage is home, slowly lower the heels without moving the carriage
Repeat 4x
Reverse the sequence
VIDEO
*STEP 1
**STEP 2
***STEP 5
Did this MoveCoLab Tuesday Tip help? Share your findings with us at info@movecolab.com
As a dancer, traveling can be extremely hard on the body so it’s important
to take care while touring in order to stay strong and injury free.
Here are some tips that may help while on tour.
CONSERVE ENERGY: Tech and show days can be extremely long with little time to rest or refuel. How you spend your energy in these days is very important. Sometimes tech, dress and performance will all be in the same day and you will have to decide how much energy is needed for each task and of course how you can give your all for the performance.
CAT NAP: On the days that you are really exhausted, try to find time for a quick 15 – 20 minute nap. It doesn’t help to fight the exhaustion. You may find it helpful to give into it… Your body will recharge and restore your energy but don’t make the nap too long!
How did this Tip work for you?
Email us your results at info@movecolab.com!
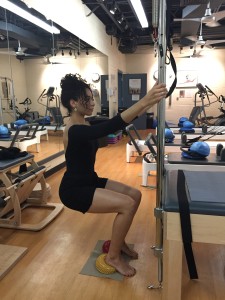
Faulty jumping techniques can cause injury to the spine, foot/ankle, knee and/or hip joints. Avoid this by practicing proper jumping technique on the reformer. Start by finding your alignment through the lower extremity and practicing the sequence of a jump to learn how to roll through the feet. Continue into a jump sequence to increase core control and axial elongation and to focus on propulsion.
**Jump Prep – STEP 3
*Jump Prep – STEP 1
Progression: Decrease springs to increase core control
Set Up:
Springs: Red/Yellow
Lie supine on the carriage in neutral spine
Begin with feet in parallel, press the carriage out to lengthen the legs with heels down on the jumpboard
Set the heels up slightly above the sits bones and lift the headrest to see your feet
Jump Prep:
Flex the knees tracking them over the first and second metatarsals while maintaining the heels on the board*
Extend the knees to lengthen the legs
Press the heels up sending the weight over the first and second metatarsals**
Lower the heels to the board maintaining the length of the legs
Repeat this sequence 6x
Exercise:
Following the sequence above continue into a jump
Flex the knees and quickly propel the carriage up with lengthened legs
Articulate through the foot/ankle in the landing as you transition through toe, ball, heel before flexing the knees again
Emphasis is on the propulsion up and the controlled landing through the feet
Kneeling Rotation with Magic Circle Special thanks to Stacey Futterman and 5 Point PT!
Increase spine mobility by adding thoracic rotation exercises into your practice. The thoracic spine laterally translates, laterally flexes and rotates the spine. When the thoracic segments lose their mobility, the lumbar and cervical segments pick up the slack and overwork. Restoring rotation to the thoracics will remind the entire spine it’s range of mobility, how to disperse forces evenly from head to tail and also wring out the lungs.
Set up:
1 blue spring
Begin kneeling on the reformer with whole body facing right
Place magic circle on the right ribs (like a basketball hoop) allowing the upper body to slightly rotate to the right
Short loop will go around the outer pad of the magic circle and will be held by both hands
Exercise:
While maintaining the hips square to the wall, slide the magic circle across the top of the rib cage without losing contact
Allow eyes to lead the movement as the spine rotates all the way to the left
Variation: Once the upper body has rotated all the way to one side, hold this position and take tiny pulses (8ct) to the left to access even more rotation.
Begin with UB slightly rotated to the right with hips square
Lead with the eyes as the spine rotates to the left
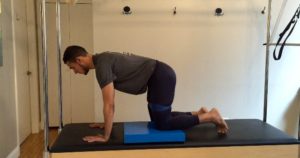
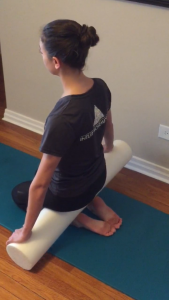
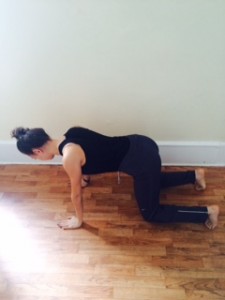
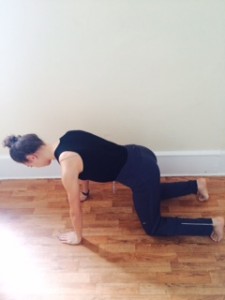
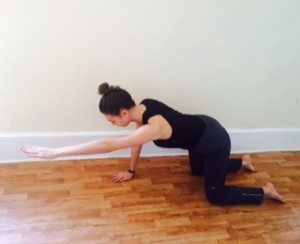
This Tip is designed to stabilize the pelvis and spine while ranging the hips. When performing this exercise it is important to maintain the spine in the neutral plane, which is the alignment of the sacral apex, T7, and occiput.
Exercise:
Begin in quadruped with foam roller below the knees
See cues from May 10, 2016: Tips for Upper Extremity WB for proper alignment of the upper extremity
Take 4 counts to drag the knees towards the eyes, the roller will move towards the ankles
As a dancer, traveling can be extremely hard on the body so it’s important to take care while touring in order to stay strong and injury free. Here are some tips that I discovered while on tour:
Photo by Christian Zelder
WARM UP AND STAY WARM: Each day you get to the theater there is an allotted time and space for warm-up. Sometimes company class is offered and other times you will be in charge of your own warm up. These warm-up times are usually way before the actual performance or dress rehearsal. This is the tricky part; although you warmed up and were feeling great at the beginning of the day, tech and show days tend to be long and draining. In those hours in between the warm up and performance you need to conserve your energy and stay warm. Always bring lots of layers to the theater as well as booties, a hat and a scarf. Be prepared for cold spaces. I also found it helpful to come up with a quick and efficient warm-up series that can be done in smaller spaces. Staying warm will keep your body happy and injury free!
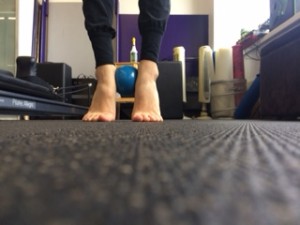
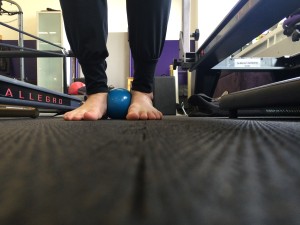
This tip is a great way to protect the wrists and shoulders in upper extremity weight-bearing exercises. It is especially helpful for those who experience wrist pain or have shoulder injuries or pathologies.
Hasta Bandha – look for the MoveCoLab logos!
There are 3 important things to remember when weight-bearing through the upper extremity for optimal alignment, joint congruencey and efficiency of movement:
Press fingertips into the mat or floor to create a co-contraction of the muscles around the small bones of the wrist
Shine the eyes of the elbows in towards each other.
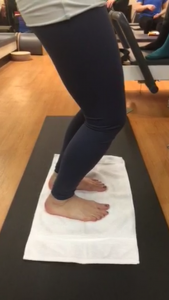
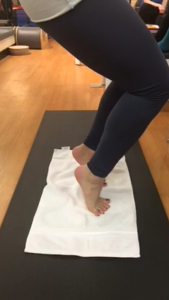
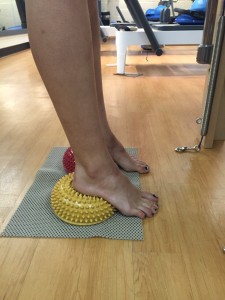
Special thanks to Blas Chamorro Quiros for introducing us to this exercise! Foot rinser is designed to stretch the plantar fascia and the long toe flexors and extensors of the feet. It also works to rinse stagnation out of sticky talus joints.
Setup:
Perform on mat
Begin in quadruped with whole foot relaxed
Sequence:
Sit back on the heels with toes relaxed, stacking the ribs, shoulders and head over the hips
Rock back into quadruped, tuck the toes under and sit back on the heels, restacking the pelvis, ribs, shoulders and head. Use the weight of the body to open up the toe and talus joints of the feet
If all 5 toes do not make contact with the mat, immediately reach back and facilitate the toe tuck with the hands
Maintain a steady rhythm throughout the exercise – this will allow the foot to yoke open and will make the stretch more accessible
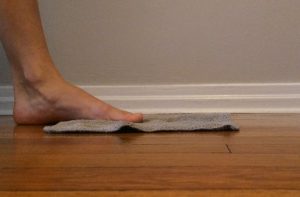
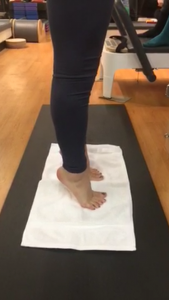
This exercise is designed for stability training of the intrinsics and the long toe flexors of the foot to support the natural arch. It is important to perform this exercise slowly to master motor control.
Begin in parallel with toes on the towel
Curl the toes to grab the towel and draw it in towards the heel trying to keep the ball of the foot on the floor
Release the curl and repeat until towel is gathered urder the arch
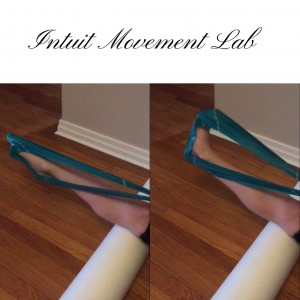
This Tip is designed to improve mobility of the foot/ankle joint, while providing feedback from the T band. The cursive writing variation educates the joint to move fluidly and with continuous control, while the Zorro rehearses sharp changes of direction and quick stops.
Setup
Place theraband around the foot so that the T band echoes the pathway of the achilles tendon and plantar fascia
Place foam roller or coffee can under the knee
Knee remains extended for the whole exercise
Smooth signature
With your heel, trace your signature in large, continuous and smooth movements
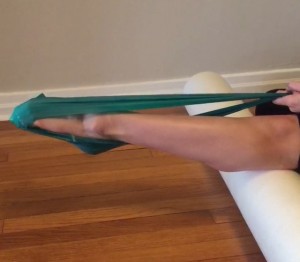
This technique teaches acceleration and deceleration control of the foot and ankle. The theraband is used to increase the proprioception of the foot and offer feedback. Always perform barefoot.
Setup:
Place theraband around the foot so that the T band echoes the pathway of the achilles tendon and plantar fascia
Place foam roller or coffee can under the knee
Knee remains extended for the whole exercise
Plantarflexion and Dorsiflexion of the Whole Foot
Step 1: Quick plantar flexion (1 count), slow dorsiflexion (4-6 counts) – SEE VIDEO
Step 2: Retrograde. Quick dorsi flexion (1 count), slow plantarflexion (4-6 counts) – SEE VIDEO
Complete 8-16 repetitions
Plantar flexion
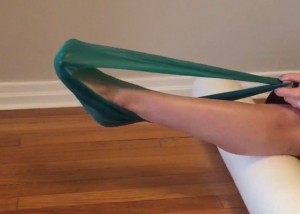
Plantarflexion and Dorsiflexion of just the Toes
Repeat the choreography above while maintaining plantar flexion of the ankle
Pregnancy does not mean having to give up your daily exercise routine. In fact, modified mat work is a great way for expecting mothers to strengthen their pelvic floor, increase shoulder stability, maintain correct posture and improve balance all the way through the second trimester.
Lets start with finding shoulder stability:
Scapular Protraction/Retraction
Begin with shoulders stacked over the wrists and hips over the knees
Maintain a long spine by sending energy out the top of the head and reaching long through the tail
On inhale, sink the rib cage towards floor as the shoulder blades try to touch
On exhale, float the rib cage back up to create space between the shoulder blades, imagine you are drawing the baby towards your spine gently
Quadruped with Arm Reaching out
Once you’ve found the scapula flat on the back maintain this position
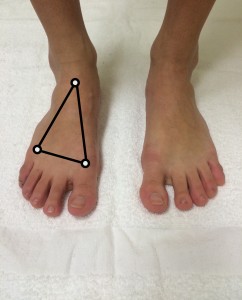
Like a camera tripod, our feet are designed to be tripods. Proper alignment in standing means we have equal weight on the heel, the ball of the foot under the big toe and the ball of the foot under the 5th toe. If we do not have equal pressure under each leg of the tripod, the camera will be tilted. In the body, this means altered alignment up the kinetic chain.
Stand with your weight on both feet in a comfortable standing posture.
Sense where the pressure is under each foot of your tripods.
Is your weight toward the heels or toes?
Is there more pressure under the big toe? The little toe?
If so, fix it! Try to keep your weight equally distributed between each foot.
Keeping the pressure equal under each leg of your two tripods, bend and straighten your knees 10 times and sense where the pressure goes.
If your pressure changes, try to keep the weight equally distributed on each point of your tripods as you bend your knees.
Stand on one foot. How challenging is it for you to maintain this alignment?
Bend and straighten the knee 10 times in single leg stance while again maintaining pressure in all three points of your tripod.
If we can emphasize the tripod nature of the foot, alignment and balance will improve.
Did this MoveCoLab Tuesday Tip help? Share your findings with us at info@movecolab.com
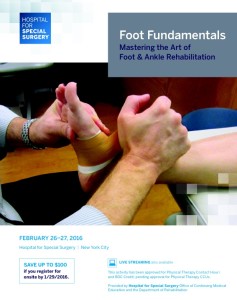
Mastering the Art of Foot and Ankle Rehabilitation
Following his passion for teaching, Bob is pleased to have created the course Foot Fundamentals: Mastering the Art of Foot and Ankle Rehabilitation to be presented at Hospital for Special Surgery on February 26-27, 2016. He has assembled experts in the fields of orthopedic surgery and orthopedic physical therapy into a two day comprehensive program. The second day is a hands on lab course where he will be teaching his specialized manual mobilization techniques to physical therapists. Enrollment has been very heavy and is near capacity. Registration information can be found on the brochure.
Pictured here is Andy Santana, who we affectionately call, Prince Andrew. Our Prince has been aiming to study dance abroad for years. Here he is at Ein Gedi on a weekend break from his studies at the Jerusalem Academy of Music and Dance. A dedicated young dancer and choreographer, Prince Andrew remains in close contact with us while abroad. He inspires us with his adventures and successes – illustrating how perseverance can manifest your dreams.
LEARN, DO, TEACH – a sequence for meaningful teaching moments.
How do you become a Master teacher? By becoming a Master performer of your craft. Rather than attempting to teach a movement you have observed, be sure to fully experiment with it on your own body first. Your teaching will resonate authentically when you can draw on your personal kinesthetic experiences. LEARN from a Master, DO the form until mastered, then TEACH what you know.
Stretching can be more effective when dynamic. This week’s tip illustrates how to yoke the hamstrings and adductors through movement. Grab your yoga strap or theraband and join us on your mat! Send your feedback about this tip to info@movecolab.com.
Lying on your back, bring your legs into a bridge prep position with soles of the feet on the floor. Find your optimal alignment of your pelvis and spine.
Lasso your foot with a yoga strap or theraband placing this prop over the ball of the foot. Extend your leg up towards the ceiling at a range where you can access terminal knee extension with a relaxed foot/ankle (image #1).
Now complete this 4-count phrase:
1). flex your knee
2). extend your knee
3). with knee extended-tug on your strap to increase the stretch
4). release the tug
Repeat this for 8 repetitions.
Then range the thigh into slight external rotation and abduction. Repeat the whole 4-count phrase with your thigh in this placement for another 8 repetitions (image #2).
Finish the series with a sickle stretch. Hold the stretch for 4-8 breath cycles (image #3).
Incorporating 2 minute circuit flows into our workouts have been a great challenge for us at MoveCoLab! Here’s how to join our 2 Min Circuit Challenge.
Photo by Whitney Browne
1). Set 3 stations:
Lower Extremity (LE)
ABS
Upper Extremity (UE)
2).Set choreography at each station that you can perform continuously for 2 mins:
LE: Goblin Squats with medicine ball or kettle bell
ABS: Pilates Abs Series of 5 into Bicycle and Scissors in the Air
UE: 8 Push Ups/Side Plank Right for 8 counts/Leg Pull Front for 8 counts/Side Plank Left for 8 counts
3).Set the timer on your phone to ring every 2 minutes.
4). Complete a station and then move directly to the next so that you flow for 6 minutes through the full circuit. Break only for 30 seconds between each full circuit.
5).Repeat 3-5 full circuits
Did this MoveCoLab Tuesday Tip help? Share your findings with us at info@movecolab.com
Legs Diamond aka Clamshells is an MoveCoLab favorite for home exercise programs. Be sure that you are performing them with the same quality you’d like to see on stage.
Use a 4 count rhythmic base to perform this sequence in a neutral hip (as shown), at 45 degrees hip flexion, 90 degrees hip flexion and then also 5 degrees hip extension. The 4 count base will facilitate acceleration and deceleration control of the deep rotators of the femur. The various angles of hip flexion will condition the hip in multiple ranges of motion used in activity of daily living and sport specific movements.
Legs Diamond with knee extension
Legs Diamond in neutral hip
Rotate the femur bone into the diamond shape keeping heels together in 4 slow counts
Extend the knee maintaining the rotation of the femur bone to lengthen the lever in 4 slow counts
Flex the knee to find your heels touching back into the diamond shape as you maintain the femur in rotation in 4 slow counts
Slowly draw the top knee down to meet the bottom knee in 4 slow counts
Do you find that your clients are lacking sufficient lumbar flexion to perform a fluid and controlled Assisted Teaser, Roll Up or Rolling Like a Ball exercise? Try REMINDING THE RIBS as a way to help the lumbars relax out of hyperextension.
ASSESS: Perform an Assisted Teaser on the Tower bar to establish a base line measurement of accessible ROM
Take a deflated Togu Ball and place under T7
Have client perform 4-6 thoracic curls in sagittal plane. Note available ROM again.
MOVEMENT INTERVENTION: On Togu ball placed at T7, ask client to roll half way up to a thoracic curl.
From this position, ask them to laterally translate the ribs and you cue pelvic stabilization. Cue ribs to SLIDE across the ball for 8-10 repetitions.
Then ask client to laterally flex spine while on the Togu Ball. Cue pelvis stabilization and “windshield wiping” movement from head to lower T-spine for 8-10 repetitions.
Finish with 4-6 more thoracic curls in sagittal plane.
Thoracic curl up
Lateral translation of ribs
Lateral flexion of ribs
REASSESS: Perform the Assisted Teaser again. Do you notice an increase in ROM of the T-Spine and L-spine? Do you see any changes in effort or flow of movement? Do you notice changes in your client’s energy and expression?
Model: Mariela Dorado, BFA Senior and Polestar Pilates Teacher Trainer
How did this MoveCoLab Tuesday Tip work for you?
Send us your findings at info@movecolab.com!
Feeling burned out and bored with your own teaching of the Pilates Mat repertoire? Try teaching a 360 Degree Mat Class by changing your orientation to the Mat after each exercise or a series of two exercises threaded together. Challenge yourself further my maintaining a flow.Once you have established a flow, progress by then moving 360 degrees in seated and kneeling repertoire and then further develop this theme into weight bearing. By varying your orientation to gravity information is more interesting and “sticky” to the brain.
Here’s a great sequence to try:
Bridging with marching variations into 100’s
Right Side Hip Abduction Sequence
Swimming
Left Side Hip Abduction Sequence
–
Photo by Whitney Browne
Roll Up into Roll Over
Right forearm side planks
Swan
Left forearm side planks
–
Saw into Spine Stretch
Right Kneeling Side Kick
Breaststroke
Left Kneeling Side Kick
–
Leg Pull
Right Side Bend
Rocking
Left Side Bend
What do you think of this MoveCoLab TeachingTip? Share your ideas with us at info@movecolab.com!
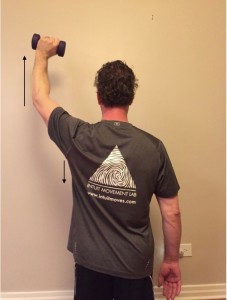
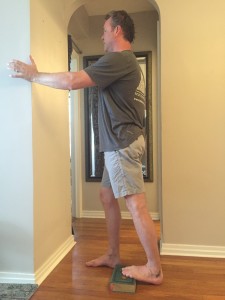
Now that you have learned to stabilize your humeral head and your scapula with the MoveCoLab Tuesday Tips from the past 3 weeks, it is time now to learn how to lift overhead without generating pain or a pinch in the shoulder. This activity is important for everything from reaching up into a kitchen or bathroom cabinet, lifting your bag into the overhead compartment of an airplane or train, or when reaching up in your closet for those tucked away items.
Proper Alignment and Form
Improper Alignment and Form
Before lifting any weights overhead, it is important to reach your unweighted arm overhead with good congruency. As you gently glide your scapula down toward the floor, lift your arm up overhead while maintaining the downward stabilization of the humeral head and scapula. Repeat this 5-10 times
If you can maintain your shoulder congruency, add a light weight and reach up overhead as if placing it on the top shelf of your closet
Watch the space between your shoulder and your ear to maintain a long neck and stable shoulder
Repeat this movement for 3 sets of 10-15 repetitions. You can progress the weight when you can complete the repetitions while maintaining proper alignment
The photo to the right is a demonstration of the undesired movement pattern that often occurs with overhead lifting. Be sure to maintain the downward glide of the humeral head and scapula as you reach up
How did this Tip work for you? Email us your results at info@movecolab.com!
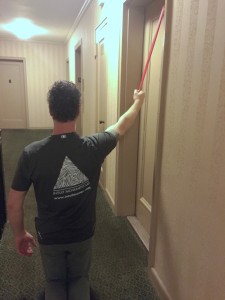
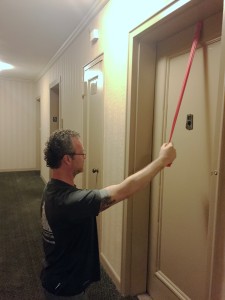
Now that you are learning to stabilize the humeral head in the socket in low positions, it is time to start exploring reaching overhead while maintaining shoulder congruency. You will be more successful in mastering overhead movements if you focus on pulling down before pushing up. This week’s tips incorporate lifting the hand above the shoulder with the emphasis on the downward movement of the humeral head and scapula to limit elevation while avoiding a pinch. Try these two moves to improve your overall lifting technique.
Stay tuned for Part III next week where we will push a weight overhead while maintaining congruency – The hardest part and where most injuries occur!
Photo 1:
Attach your theraband over the top of a door- a quick trick to do this is to tie a sock around your band and close it over the top of the door
Photo 2
Photo 1
You can stand, sit or kneel for this exercise- whatever it takes to get your arm forward in front of you with the hand overhead
Keeping your elbow straight and your thumb up, engage under the armpit to gently pull your shoulder toward the floor
Maintain this activation while pulling the band down to touch your 5th finger to the front of your thigh
The challenge is in letting the arm go back up without losing your downward push of the armpit toward the floor
Start with 2 or 3 sets of 10 and progress to 3 sets of 25 as you can
Photo 2:
Use the same setup as in the previous exercise except now turn your body to the side
Align the elbow just in front of the shoulder with the hand in front of the elbow
Follow the same instructions from the previous exercise and progress accordingly
How did this Tip work for you? Share your findings with us at info@movecolab.com
In last week’s MoveCoLab Tuesday Tip, you learned to control the humeral head to improve congruency of your shoulders. Now we need to increase control in other planes of motion.
Strengthening the external rotators
Shoulder Congruency
Starting with the external rotators of the shoulders, hold a theraband in your hands with palms facing each other.
• Gently squeeze your shoulders together and reach your elbows toward the floor, lengthening the distance between earlobes and tops of shoulders
• Slowly rotate the hands open as in the photo and return to the starting position slowly
• Repeat for 2-3 sets of 10 repetitions
Next, we will strengthen the muscles that hold your scapula (shoulder blade) securely on your back.
• Hold the band in front of your chest just below nipple level
• Gently lengthen the distance between earlobes and shoulders as in previous exercise
• Slowly open as wide as you can control the shoulders and slowly return to the starting position
• Repeat for 2-3 sets of 10 repetitions
All exercises can be progressed to increased repetitions as you gain more control.
How did this Tip work for you?Share your findings with us at info@movecolab.com
Are you having a pinching pain in your shoulder when you reach your arm overhead? Often times this is caused by poor posture and the muscles that stabilize your shoulder get deconditioned. When you then reach up, your shoulder drifts up toward your ear and you lose the congruency or natural alignment of the shoulder’s ball and socket joint causing a pinch to the tendon or the inner lining of the joint capsule. To help retrain these muscles it is important to restore the normal muscular control to the shoulder and scapula. Try the following exercises to help restore your shoulder’s natural movements.
Please Note: If you have pain that does not improve with these simple exercises or if the pain is very sharp and stabbing, you may have other issues in your shoulder that require further medical attention.
Photo 1: Leaning Forward
Photo 1
• Sit facing your desk or table with a foam roller under your forearm and thumb pointing up
• Keeping the elbow straight, push your underarm down toward the floor and hold for 5 seconds. Feel the scapula slide down your back a short distance. Repeat 5 times.
• Next, hold the scapula down as in previous step and slowly lean forward while maintaining the downward push of the shoulder blade. Reach and hold for 5 seconds and repeat 5 times. This is much like reaching over head- the shoulder needs to be retrained to stay down as we lift the arm up.
Photo 3: Leaning Sideways
Photo 2: Start Position
Photos 2 and 3:
• Turn sideways and repeat with the arm out to the side with the elbow slightly in front of the shoulder.
• Progress to leaning sideways- this effectively elevates the arm as if reaching overhead sideways. Remember to maintain the space between your ear and the top of your shoulder as you lean forward or sideways.
How did this Tip work for you?Share your findings with us at info@movecolab.com
This past week has been amazing. I went to Chicago for the North American Spine Society’s Annual Meeting and presented on the podium as part of a panel of experts on Lumbar pain as a result of hip injuries. It was very inspiring to be in front of an audience of spine surgeons and other professionals and educate them on a topic that they are not as well versed in. Feedback from the audience was very positive with excellent questions- demonstrating that learning never stops. If you are open minded.
After speaking at NASS on Thursday afternoon, I flew back to NYC to moderate and teach in a course that we hosted at Hospital for Special Surgery. It was entitled Conservative Treatment of the Lumbar Spine. Although exhausting to keep such a schedule, it is very rewarding to assist in educating others in how to assess and treat their patients. After 24 years in the Physical Therapy profession, the rewards come in not only helping patients to feel better but in paying it forward by teaching others what I have learned over the years. Even as an educator, I learn every day- teaching is a cyclical dialogue which is not unidirectional. Students learn from teachers who learn from students.
What do you think of this MoveCoLab Tuesday Tip? Share your ideas with us at info@movecolab.com
The primary action of your lumbar spine is to flex and extend. Reminding the lumbars of what they are mechanically built to do helps us absorb and distribute forces through the entire spine more effortlessly. Try this foam roller exercise to open the lumbar region of the spine and tells us about your results by emailing info@movecolab.com!
Let’s set a “before” movement to assess whether or not we are doing what we intend to do…
Lying on the mat, place your feet on the wall in a chair position and bridge up 4-6 times. Notice how your spine feels, where you sense movement and stagnation.
Lie on your foam roller with your bare feet up against the wall in the same chair position
Be sure the roller is under the entire length spine, including the skull
Imagine your pelvis as a compass:
Lie on the foam roller with your feet on the wall in chair position
North = pubis bone
South = belly button
East = right hip bone
West = left hip bone
Inhale and roll into your North point, ranging the lumbars into extension
Exhale and roll into your South point, ranging the lumbars into flexion
REPEAT THIS 4-6 TIMES
Exhale and roll to your East point, allow gravity to help the right femur bone to drop deeply into the hip socket
Inhale as you roll to your West point, encouraging the left femur bone into joint congruency
REPEAT THIS 4-6 TIMES
Now roll from North to East to South to West, in a circular, fluid motion 4-6 times
Repeat the pelvic compass in the opposite direction for another seamless 4-6 repetitions
Rock one more time from North to South, allow South to initiate a full bridge on the roller by stepping your footprints into the wall. Keep your hands on the floor.
Slowly bridge up and down
Bridge up off of the roller for another 4-6 repetitions. Each time you descend back to the roller, slow down more and more so that gravity can help you strike one vertebral body at a time onto the roller
Now perform your “before” movement again. Do you sense any changes in the range of motion of your spine after having performed the pelvic compass and bridges on the foam roller?
How did this Tip work for you? Share your findings with us at info@movecolab.com
Want to shine some light into your feet? Wake them up and put them to work transmitting forces up the lower extremity with this MoveCoLab Tuesday Tip!
Standing on spiky half domes, take 6-8 squats. After the 8th squat, glide forward and back like an Olympic slalom skier getting ready to launch out of the opening gate. Begin with the spiky half domes under the heels, feet wrapping and melting over the dome. Repeat the sequence moving the domes from the heel towards to mid foot and finishing at the forefoot.
Stand on spiky dome balls
Take your 6-8 squats
Glide forward and back
Model: Jennifer Payan, BFA Senior and Polestar Pilates Teacher Trainer.
How did this MoveCoLab Tuesday Tip work for you? Share your findings with us at info@movecolab.com
Your hamstrings are a large muscle group that connects your lower leg to your pelvis. These long muscles are left in a shortened position when we sit in a chair. How much time do you spend sitting? If you are like most people, it is much more than you think.
In this case, your hamstrings will get short and tight. In order totouch your toes, you need to have adequate length of these muscles. Maintaining good flexibility therefore requires a bit of effort and proper form so you don’t hurt your back trying to reach down.
Try this tip to maximally stretch your hamstrings and reduce back and leg pain:
As you gain flexibility, hinge at the hips to increase the stretch.
Stand up tall, tilt your tailbone toward your head
Stand holding on to a wall for support with your foot on a chair. Square your hips so your leg makes a right angle to your pelvis and keep your knee and back straight as if you are trying to make the letter “L.”
Gently lift your tailbone toward the back of your head and feel the stretch in the back of your leg.
As you gain flexibility, you can hinge at the hips to transform your “L” to a “V”. Hold your stretch for 60 seconds or more and repeat after sitting for 2 hours.
How did this Tip work for you? Share your findings with us at info@movecolab.com
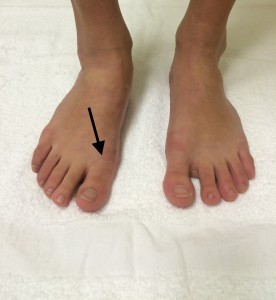
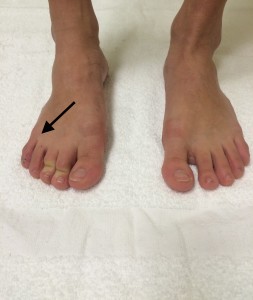
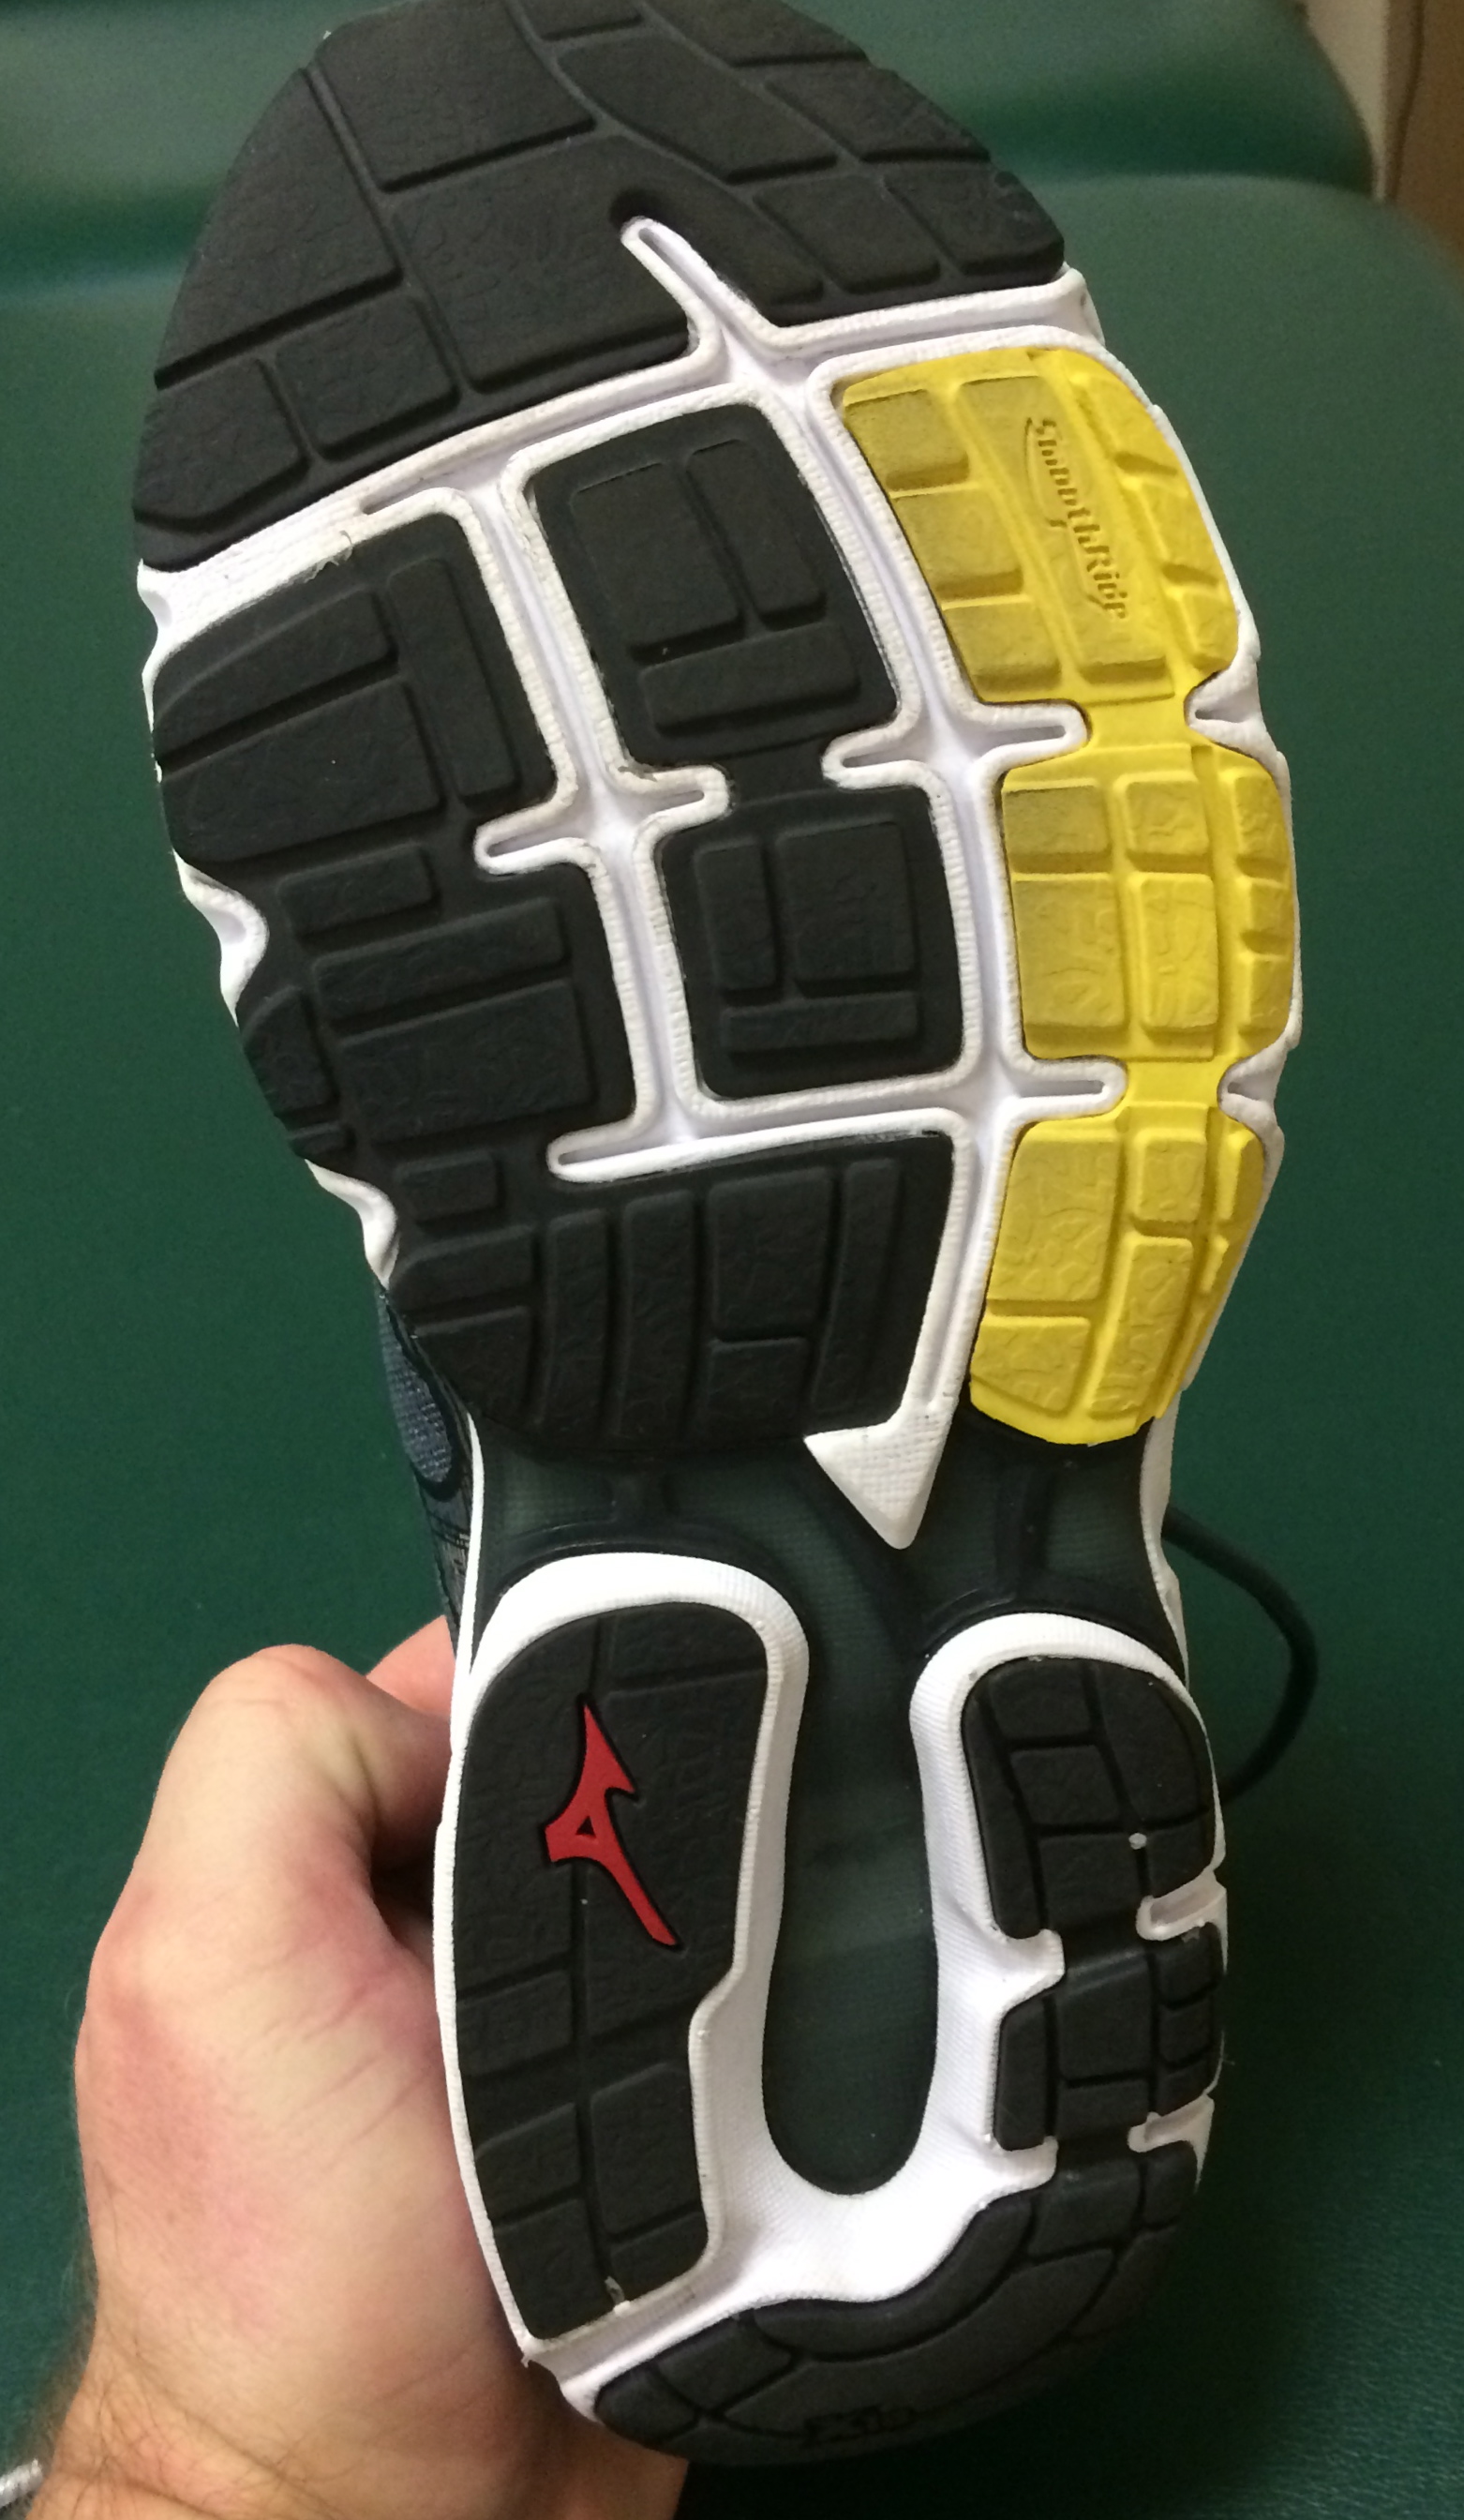
Use this Tip to help you understand how to choose the best type of footwear for your feet!
Take note of the shape of your foot.
Your footwear should mirror the shape of your foot.
Footwear trends often tend to be based on new style or a new theory about what is best for a specific activity. With the NYC Marathon approaching, many thousands of people are ramping up their training and may be wearing the wrong type of running shoe.
Proper foot function depends on having a strong yet flexible foot. Matching your footwear to your foot shape is critical to injury prevention. If your foot looks relatively straight and your shoe looks like a boomerang, you may need to change your shoe as you are changing the shape of your foot to something it is not. Ask for a shoe with a straight last.
If you are experiencing pain for a week or more that does not resolve with rest, ice and stretching, you may need to have your feet and footwear evaluated for a proper fit.
Did this MoveCoLab Tuesday Tip help? Share your findings with us at info@movecolab.com
Do you suffer from sharp pain in your heel when you first get up in the morning or after you have been sitting for a short period of time? If so, you may have plantar fasciitis.
Stretching the bottoms of the feet can help alleviate the pain associated with plantar fasciitis.
If you suspect you have plantar fasciitis, perform the exercises from our June 9th MoveCoLab Tuesday Tip “Biscuits to Bananas” and then add this one:
With your sneakers on, place the ball of the foot up against the door with the ball of the foot in the air. Slowly bend your knee toward the wall so the toes bend backward, keeping your heel firmly planted to the floor. Try to relax the tendon in the front of your ankle. You may feel the stretch either under the toes, in the arch or up into your Achilles. Hold for 30 seconds. Rest and shake it out, then repeat.
If your symptoms do not change after a few weeks of doing this, we recommend you seek guidance from your medical doctor who may prescribe a short course of physical therapy to help control your symptoms.
Did this MoveCoLab Tuesday Tip work for you? Share your findings with us at info@movecolab.com
Have you ever considered that your calf flexibility also informs movements at your knees, hips and spine? Many foot ankle problems begin with tightness of the calves: Achilles tendonitis, plantar fasciitis, knee pain and even low back pain. Adequate ankle mobility is critical to being able to perform common everyday activities such as descending stairs without ankle or knee pain. If you participate in a sport that involves repetitive use of the feet, follow these simple steps to improve your calf flexibility.
STEPS 1-7
1. Lean against a wall or solid object with one foot in front of the other
2. Keep the heel of the back foot firmly anchored to the floor and in a nearly straight line to the toes
3. Bend the front knee while keeping the back knee straight and lean the pelvis toward the wall
4. Feel the stretch in the bulk of the calf muscle
5. Hold for 10 slow, relaxed breaths
6. Next, bend the back knee while keeping the heel firmly anchored to the floor.
These stretches can also be done with the toes on a book, curb or a slant board to intensify the stretch.
7. Lower your body weight straight down so your sit bone aligns over your heel- you should feel the stretch move down toward the Achilles. Hold for 10 slow, relaxed breaths.
Did this MoveCoLab Tuesday Tip help? Share your findings with us at info@movecolab.com
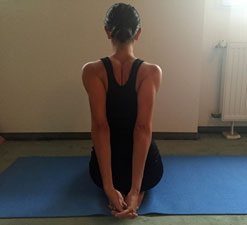
Did you like how you felt after opening up your chest on the foam roller and in Fish Pose? Then this week’s Tip is for you!
Extend the arms, continue to lean in
Stand with arms 90×90 and lean in
Stretching the pecs in the doorway offer a convenient and portable way to open the chest and improve spinal alignment.
1. Stand in a doorway with the wrists and elbows against the door frame in a 90 x 90 position (the letter E position) with one foot in front of the other. Lean the chest forward and knit the ribs together to limit extending the spine. Breathe 10 slow, relaxed breaths.
2. Next, move the arms up into a Y position and repeat as above
Repeat these stretches a few times each day or anytime you have been sitting at the computer for a few hours!
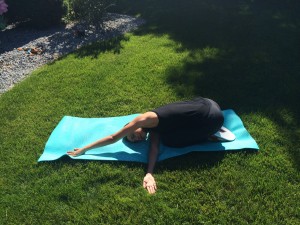
Use a rotated Child’s pose to open the ribs and sides of the body.
Thread your right arm under your left arm.
1. Start in child’s pose: big toes touching, kneecaps pointing to the side edges of your mat, chest melting to space between your knees.
2. Slide the left arm into the central axis of your mat, aligned with your tailbone
3. Thread your right arm under your left arm.
4. Spin face and chest upwards as you anchor your hip points down towards the mat.
5. Hold for four breath cycles.
6. Creep your fingertips away from center of body to enhance the revolution of the spine.
7. Repeat to other side
Model: Maria Volpe, BFA
Polestar Pilates Teacher Trainer
Did this MoveCoLab Tuesday Tip work for you? Email us your results at info@movecolab.com
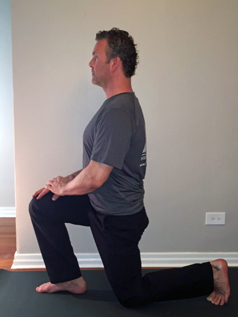
Now that you’ve released your psoas muscles and they are pliable, gently stretch them to find more length.
1. Kneel with a cushion under your knee in a lunge position near an object for support.
2. Tuck the toes under on the leg that is down.
Lift the pubic bone by drawing in the navel.
Squeeze the buttocks/glute on the same side so that the stretch is felt in the front of the hip/thigh.
Hold for 20-30 seconds being sure the buttocks/glutes remain firm. No mushy tushy!
Repeat 2-3 times.
Did this MoveCoLab Tuesday Tip help? Share your findings with us at info@movecolab.com
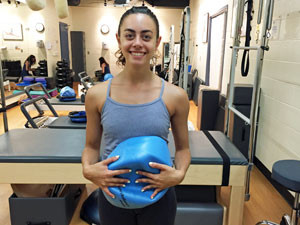
The word psoas comes from the Greek psoa meaning the “loin region”.
STEP 1
STEP 2
1. Use an overball that is initially under inflated. Place ball in the abdomen directly under the navel.
2. Lay prone over the ball with your hands folded under your forehead and legs out straight with the hips rolled in. Relax over the ball and breathe through the rib cage and back.
Start with 30-60 seconds as tolerated.
Progress by increasing time to 2 minutes and later by inflating the ball to increase firmness.
Model: Maria Volpe, BFA
Polestar Pilates Teacher Trainer
Did this MoveCoLab Tuesday Tip help? Share your findings with us at info@movecolab.com
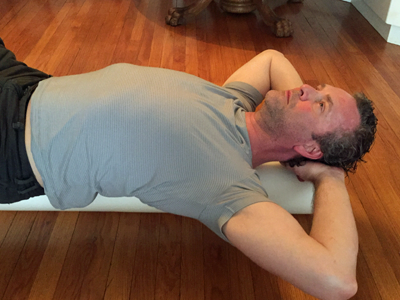
Do you notice your mid-back or thoracic spine changing as a result of using your smart phone, computer or tablet?
Bob lying supine on a foam roller
1. Find length and space in your spine by lying supine on your foam roller. 2. Clasp hands behind your head. 3. Ribs gently knitting together and downwards towards the navel. 4. Tailbone gently anchored to the foam roll. 5. Relax the throat and jaw. 6. Take 10 slow, relaxed breaths. 7. Stay longer if it feels good. 8. Roll off slowly and carefully and lay on your side for a moment before sitting up.
Did this MoveCoLab Tuesday Tip help your posture? Share your findings with us at info@movecolab.com
How can we deepen our somatic practices and dive deeper into our understanding of how our bodies move? Deepen your breath through timed breathing exercises. Connect to your favorite mellow music mix and time the length of inhalation and exhalation. How does focusing on breathing change or shift the way your body feels? Carve out 3 minutes a day to perform this. Send us a message with your results: info@movecolab.com
Tune into your favorite mellow playlist.
Start by lying on your back in a Constructive Rest position. Hands on the abdomen, eyes closed. Scan your body with your mind’s eye. How does your body feel? Where are you feeling stagnation of energy?
Find the pulse of the music. Try to match your internal metronome to the pulse of the music.
Inhale for 4 beats of the song. Exhale for 4 beats. Repeat for 4 cycles.
Gradually increase the inhalation and exhalation by adding a count after every 4 cycles. (ex: 5 counts inhale/5 counts exhale for 4 cycles, 6 counts inhale/6 counts exhale for 4 cycles) Repeat for 4 cycles.
Continue until you have elasticized the breath to 10 counts for an inhalation and 10 counts for an exhalation. Repeat for 4 cycles.
Finish by allowing the breath to fall into its own rhythm.
Did your depth of inhalation and exhalation change? How does your body feel in comparison to the opening assessment?
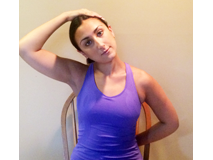
Neck pain can be an uncomfortable experience, and is extremely prevalent due to activities of daily living that cause our heads and shoulders to round forward. Outlined below are four simple stretches to provide relief, that can be done in under 10 minutes.
1. Chicken Wings
2. Triple Neck Stretch
3. Prone Extension
4. Shoulder Blade Lift
Performing this series of stretches once a day will help to relieve tension, correct musculoskeletal imbalances, and restore flexibility. Happy stretching!
Chicken Wings:
Sit up tall in a chair, and touch your fingertips to your shoulders.
Roll both shoulders back and down.
Hold for 10 breaths.
Triple Neck Stretch:
Sitting on the edge of a chair, bring your right hand to the middle of your back.
While looking straight ahead, tilt your head to the left. You may use your left hand to gently pull your head down.
Next, tilt your head so that you are looking down toward your left shoulder.
Last, place the palm of your right hand behind your neck, keeping shoulder blades down.
Hold for 5-10 breaths, then repeat on the opposite side.
Prone Extension:
Lie on your stomach, on a mat or carpet with your hands stacked beneath your forehead, legs straight behind you.
Keep your abdomen engaged to protect your lower back.
Inhale to lift your head and chest 2-3 inches off of the floor, and exhale to come back down.
Repeat 10 times.
Shoulder Blade Lift:
Lie on your stomach, on a mat or carpet with a rolled-up towel beneath your forehead. Be sure to keep your nose pointing toward the floor.
Extend your arms out in front of you, into a Y-shape.
Keeping your head down, inhale to lift your arms, hold for a beat, then lower your arms back down. Keep your chest and neck relaxed.
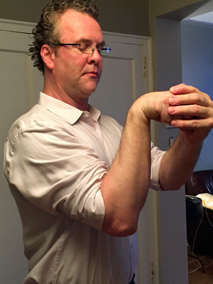
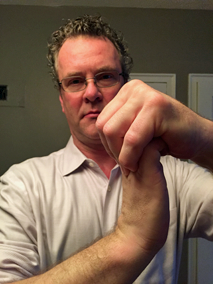
How much do you use your hands? Do writing, typing, working, or DIY projects lead to pain and stiffness in your hands? If so, this week’s Tuesday Tip is for you! These 4 stretches can be done in any order and will help you release the built up tension you have in your hands and forearms. Try to do them as soon as you feel tension building up, or are experiencing pain below the elbow. Repeat as many times as necessary.
1. Finger Flexor Stretch
2. Golf Club
3. Periscope
4. Short Finger Stretch
Incorporating these simple, quick stretches will give you the dexterity your hands need to help you get your jobs done!
Finger Flexor Stretch:
Stand at your desk with your fingers pointing back toward your thighs. Keeping the heels of the hands firmly planted on your desk and your elbows straight, lean your body back toward the fingertips. You will feel a stretch in the fingers, palms and up the forearms to the elbows. Hold for 10 slow breaths.
Golf Club:
Straighten your arm and make a fist. Turn your fist away from your body as if your arm is shaped like a golf club. Reach over the top with the opposite hand and gently pull your fist toward your elbow (keep your fingers curled). You will feel a stretch in the top of the wrist and up the forearm. Hold for 10 slow breaths.
Periscope:
Bend your elbow and make a fist. Reach over the top of the fist and pull it down toward your elbow. Rotate your fist as if you are looking through a periscope to find where you feel the most stretch and hold for 10 slow breaths.
Short Finger Stretch:
Bend your finger pads toward your palm. Reach over the top and squeeze the pads toward the palm as you bend your closest knuckles back toward the top of your hand. Hold for 10 slow breaths and repeat on the other side.
ALWAYS keep yourself in the seat of the student! Look up to masters, elders and colleagues for mentorship. Look to learn from your own students, clients and patients, regardless of your years of expertise in your field. How can another field inform your practice of Rehabilitation, Pilates, Choreography and Teaching?
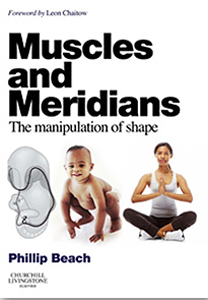
Kim is now diving into the writings of the legendary Bruce Lee and Bob continues to hone his clinical practice by studying the work of Phillip Beach.
Who can you look to for a new light to brighten your work? Let’s hear about your process of lifelong learning and share with one another.
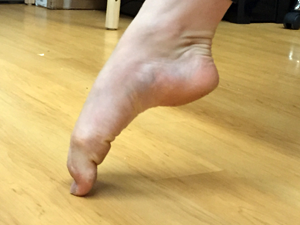
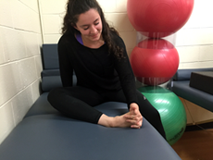
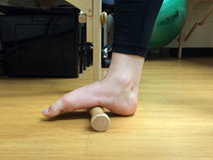
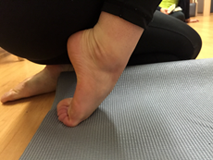
Do your feet ache after long days at work or after performing your favorite movement activity?
Do you ever feel like traditional treatment options for foot/ankle pain have failed you or only resolve pain in the short term?
Articulate feet for runners, basketball players, yogis, surfers, nurses and people of all walks of life help the body absorb and transmit force!
Follow these FOUR easy steps to increase the mobility of your foot, resulting in a more articulate foot and beautiful banana boat feet! Spend 1 minute on each step with each foot. In 8 magical minutes, a banana is born!
STEP 1
STEP 2
STEP 3
STEP 4
Lace your fingers between your toes so that the webbing of your fingers meets the webbing of your toes. Once laced, make small infinity signs or circles with your hand to stretch the space between the metatarsals and stretch the toes. Perform for 1 minute on each foot.
Use a soft tennis ball and SLOWLY roll the sole of the foot from the heel to the toe tips. When you reach the arch of the foot, pause, and use your hands to mold your foot to drape passively over the ball. This stretches the tissues on the dorsal (top) aspect of the foot and increases the space between the bones in the midfoot.
Repeat step #2 with a wooden roller or a slightly harder prop to increase the depth of the release to the plantar tissues and mobilize the bones of the foot.
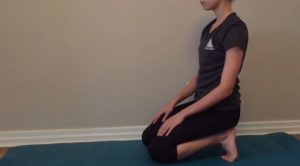
Stretch the ankle by padding the floor and sitting back towards your heel. Hold the stretch for at least 1 minute. Stretch one foot at a time for best results.
Genna Mattana
“I try to perform the feet exercises Kim taught me
before and after every dance class I take
as a warm up and cool down.
I started to see my feet improving after only one day
of this regimen! #biscutbegone.”
Genna Mattana
BFA major at Mason Gross School of the Arts – Rutgers University
Polestar Pilates Teacher Trainer
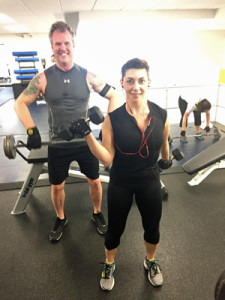
Why work out alone when you can show off for your honey?
Grab your better half and hit the gym at the top of your weekend!
Use our MoveCoLab FOUR C’s Program:
1. Cardio
2. Core
3. Conditioning
4. Calisthenics
We usually open our gym workouts with 30-40 minutes of cardio, then core training, then hit the free weights, cables, and benches, followed by at least 20 mins of stretching and always finish with a headstand. It’s a great way to build energy as a team, your confidence and have fun!
“No one knows my body better or pushes me harder than Bob Turner.” – Kim “Honestly, couples workouts are just part of our life together and I love that!” – Bob